I LOVE PITAS!!! They’re just the right amount of bread for me, not too doughy not too crusty… they’re just right. And they’re hollow. How are they hollow? It’s such a mystery to me! Maybe it’s MAGIC!! I used to think that the baker would scoop out the middle part after baking them. HA!!!! Oh, sorry if I blew the secret for you. I guess I should’ve given a spoiler alert! Oh well, you’d have figured it out sooner or later.
I’ve always wanted to try baking breads, but I’ve always thought that it was a difficult process, what with the yeast that may be active or may not, and the water that has to be exactly between 110-115ºF. UGH!! And I thought that baking pitas would be virtually impossible for a novice baker like me. But I didn’t let my fear thwart my desire. I tackled homemade rolls a few days ago and they turned out GREAT!! Check them out here. Yummy!!! So, I’m feeling empowered and and I might even dare to say invincible. GASP!! I just jinxed it, didn’t I? Oh well, here goes!!!
- 1 1/4 cup warm water (110-115 degrees)
- 1 tablespoon oil
- 1 teaspoon salt
- 2 teaspoons sugar
- 2 3/4 cups whole wheat flour OK so I didn’t check my flour stash and I had to substitute unbleached, enriched white flour…UGH!
- 1/3 cup gluten*
- 1 1/2 teaspoons dry yeast
*You can use whole wheat bread flour in place of the whole wheat flour and gluten.
Instructions:
1. In a large bowl, combine first 4 ingredients. Add the gluten and 1 cup of the flour, along with the yeast, and stir to mix. Add remaining flour and knead to make a soft dough. (Add additional flour if necessary during kneading.)
Alternately, if you have a bread machine, you can put the ingredients in the pan in the order listed and use the dough cycle. Skip to step 3 if using your bread machine! 🙂
2. Put your dough into a bowl, lightly oil the top, and cover. Set in a warm place to rise, until almost double (about an hour). I like to turn my oven on for a minute or two, then turn it off, and let the dough rise in there, since our house is cool. I highly recommend a little nap at this point just so you don’t experience the “to rise” or “not to rise” yeast stress.
3. Punch dough down and turn onto a lightly floured surface. Using a sharp knife, cut dough into 8 equal pieces. Form each piece into a ball. On a lightly floured surface, roll each ball into a 6- or 7-inch circle.
4. As you roll the rounds, set them aside on a lightly floured countertop or table, and cover loosely with a towel. Let rise for about 25-35 minutes, until slightly puffy. (The rounds will still be thin though! :D) I actually put them on baking sheets instead of the counter. And I didn’t let them rise the full time because they had extra rise time during my nap.
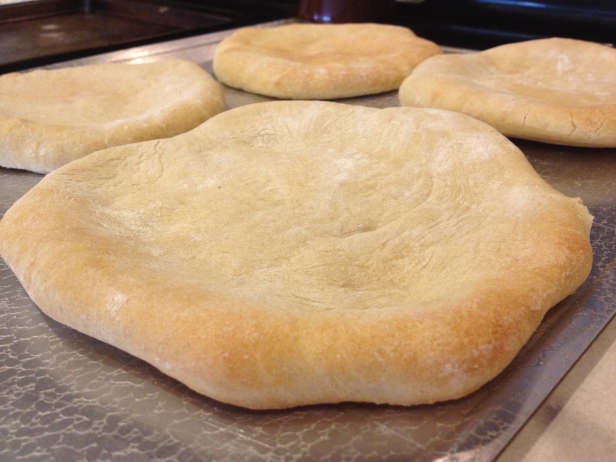
5. Preheat oven to 500 degrees. Place 2 rounds, side-by-side, onto a wire rack, such as is used for cooling things. Place rack in the middle of the oven. Bake for 4-5 minutes, until puffy and just slightly browned. (If bread is too browned, it will be dry and not pliable.) I didn’t use a rack in the oven, I just used the cookie sheets I had them rise on. They puffed right up, on their own!! I didn’t even have to scoop them out 🙂
6. Remove rack from oven and immediately wrap/layer pita breads in a damp towel, to soften. Continue baking the remaining breads, layering them between damp towels as soon as they’re baked. Allow breads to completely cool.
7. Cut pita breads in half, or split the top edge, and fill as desired. 🙂
8. Store pitas in a plastic zipper bag in the fridge for a few days, or place in the freezer for longer storage. To re-warm pitas, wrap them in a damp towel and then wrap in foil. Place in a warm (200-250 degree) oven for about 20 minutes.
So my fear is gone! They turned out great!! They taste so good when they’re fresh. MMMMMM, MMMMMM, MMMMMM!!!!
I made cute little individual pizzas using the pitas as the crust. Check them out here.